WELCOME THE LAUREL SCHOOL TODDLER, PRESCHOOL & PRE-KINDERGARTEN VIRTUAL CLASSROOMS
  • Welcome
  • Toddler
    • Ms. Naomi & Ms. Haley
    • Ms. Margo & Ms. Tonia
  • Preschool
    • Ms. Rachel
    • Ms. Julia
    • Ms. Taisha
    • Ms. Amanda
    • You Tube Stories & Songs
  • Pre-Kindergarten
    • Ms. Lynn
    • Ms. Nancy
  • Ms. Sunny's Corner
  • Student & Family Shares!
  • Contact

Ms. Naomi &
​Ms. Haley Toddler

We are missing all of our toddlers and wishing all of our families lots of love!

The Frog Life cycle

5/18/2020

0 Comments

 
Hello Families! This week we will start our study of the frog life cycle.  Frogs are such fun creatures to study! They start as an egg and then become a frog.  In this lesson we will also be making a tadpole with materials you have around your house.

What is our theme? The Frog Life cycle


What is the lesson (overall purpose)?  
Learning that frogs begin first as eggs and then develop into an adult frog.


MA Guidelines/Standards:
CD45 The older toddler improves memory for details
CD60 The younger toddler experiments with various wet and dry materials to discover their properties
CD61 The younger toddler discovers living things found in nature
CD64 The older toddler observes and identifies living things and begins to identify their basic needs


Learning Outcomes:
There are 4 stages of a frog’s life cycle; egg, tadpole, froglet, frog.   The eggs are a jelly-like mass that a mother frog lays in the water. The eggs grow until they hatch and they are now tadpoles. Tadpoles have tails but no front or back legs. They live in the water where they stay as they grow front and back legs. This is the froglet stage. At the froglet stage they lose their tails and then become frogs.  It takes about 4 months for the complete life cycle from egg to adult frog. 


Songs, Books & Videos (Motivational Techniques)

https://youtu.be/MJOSoJNeu54 Video: Frog Life Cycle Song

https://youtu.be/Yn0ErPOsI-M Video: Frog eggs

https://youtu.be/gHO6S5-5zAU Story: The Teeny Weeny Tadpole

Materials:

egg carton
scissors
green construction paper
paint brush
green paint 
glue
googly eyes


Activity (Procedure):

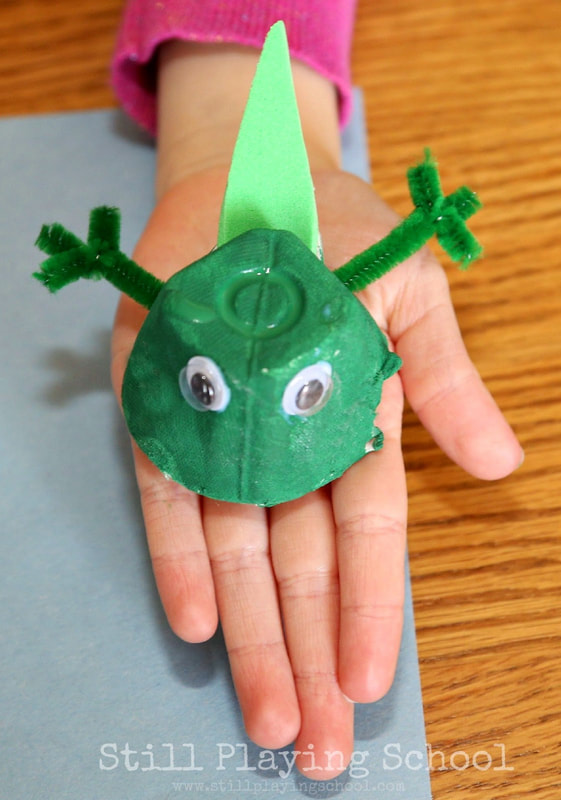
Have mom or dad cut out one section of the egg carton. (The part where the egg sits.) Paint that section green with paint using your paint brush. (This is going to be your tadpole body.) While the paint is drying,(this may take a few hours), use the scissors to cut the construction paper into a medium sized triangle. This is going to be your tadpole’s tail. (Ask for help if you are having a difficult time with the scissors!) Use the glue to add the triangle tail to one side of the body. (It’s best to attach it to the underside of the body). Let a tiny bit stick out from under the body. Now attach the googly eyes to the opposite side of the body. Now you have a tadpole!


Activity Wrap Up:
Rewatch the video “The Teeny Weeny Tadpole.” Can you notice what is different with the tadpole on each page? What is happening to the tadpole? How is he changing?


How do I know what my child is learning? 
(Assessment) Ask your child to tell you the 4 stages of the frog life cycle. (Egg, tadpole, froglet, frog).

Ask your child where the frog lays the eggs? Where does the tadpole live? 

What part of the frog body is missing when it is a tadpole? (legs)

What part of the body does a tadpole have that a frog doesn’t? (a tail)


How can you extend this activity? (Modifications)
What can you do with your tadpole? Can you try putting him in water? Will he float? Remember that tadpoles live in water as they are becoming adult frogs. 

Keep your tadpole and add legs during tomorrow’s lesson on the next stage: froglet.

Helpful Hints: (Pitfalls & Solutions)

Sometimes the glue won’t hold the tail to the egg carton. Try using a stapler to attach the tail. 

You can color the egg carton section with crayons if you don’t have green paint. 

If you don’t have an egg carton, try to build your tadpole using a stone for the body. Or how about a pine cone? 

Draw eyes on your tadpole if you don’t have googly eyes!

Picture
0 Comments

Creepy Crawlies; Ladybugs

5/15/2020

0 Comments

 
Our Lesson For the Week! 

What is our theme? Creepy Crawlies

What is the lesson?
L
isten to the read allowed story about the ladybug and listen to the ladybug songs posted below. Afterwards, we will be making a ladybug using your child’s handprint
   
MA Guidelines/Standards:
  1. CD69. The older toddler creatively explores and experiments using a variety of sensory materials and art mediums.
  2. PW34. The young toddler controls small muscles in hand.
  3. CD31. The older infant actively explores the environment to make new discoveries.

Learning Outcome: Discovering a common creepy crawly found in our area. Understanding what ladybugs are.

Songs,Books,Video(Motivational Techniques)
Songs:
https://www.youtube.com/watch?v=HFypgjYXfCA
Songs:
https://www.youtube.com/watch?v=JwaqRYTirkI
Book: https://www.youtube.com/watch?v=EUkh2cXz2yM

Materials-
  • Paper plate / Canvas / paper
  • Red paint
  • Black paint or marker
  • Your hand!
  • Pom-pom or cotton ball
  • Paint Brush

Activity (Procedure):
  1. Lay down your (canvas/paper plate/paper)
  2. Paint your hand red
  3. Press hand downwards facing on the surface
  4. Use a cotton ball and black paint, dip it in the paint, and allow child to make dots on the ladybug
  5. When handprint is try, draw or paint on eyes

Activity Wrap Up:
    Talk about the black spots on the ladybugs. Talk about the color of the ladybug being red. Talk about what body part they used to make this.

How do I know what my child is learning? 
(Assessment)
    Your child recognizes this to be a lady bug after hearing the story red allowed, doing this project, and listening to the songs above.

How can you extend this activity? (Modifications)
    You can extend this activity by going on a ladybug hunt outside. You can also listen to the songs and stories posted above.
    
Helpful Hints: (Pitfalls & Solutions)

This can be done on any surface. I listed the possible options as canvas, paper, etc. but this activity could also be done on a window with window-safe paint.

​
Picture
0 Comments

Creepy Crawlies: a hungry caterpillar!

5/14/2020

0 Comments

 
Our Lesson For the Week! 

Date: May 14, 2020

What is our theme? Creepy Crawlies

What is the lesson: Making a hungry caterpillar painting using toilet paper rolls

   
MA Guidelines/Standards:
  1. PW36. The older toddler controls small muscles in hand.
  2. LC44. The younger toddler shows motivation to read. 
  3. CD69. The older toddler creatively explores and experiments using a variety of sensory materials and art mediums.

Learning Outcomes: Identify a caterpillar, and relate it to the story being read.

Songs,Books,Video(Motivational Techniques)
Book: Hungry Caterpillar
Song: https://www.youtube.com/watch?v=_tUBBh4QzTU

Materials-
  • Toilet paper tubes
  • Red and green paint
  • Plates to hold paint
  • Paper
  • Marker to draw a face

Activity (Procedure):
  1. Read the hungry caterpillar, or watch the video of it being read
  2. Lay your paper out flat
  3. To start, use the red to make one circle for the head
  4. Dip the end of your toilet paper tube into the green paint and make the circles in a line on the paper following the red circle
  5. Draw Eyes on your caterpillar

Activity Wrap Up:
    Talk about caterpillars. Talk about what the caterpillar ate in the story.

How do I know what my child is learning? 
(Assessment)
    Your child should be able to identify the caterpillar in the story The Very Hungry Caterpillar

How can you extend this activity? (Modifications)
    You can extend this activity by going outside and going on a caterpillar hunt! They are often found hanging by trees. As the weather becomes warmer, inch worms will be easy to find.

Helpful Hints: (Pitfalls & Solutions)
    If you don’t own the book The Very Hungry Caterpillar, there are many versions online of it being read allowed

​
Picture
0 Comments

Creepy Crawlies: Ants!  & snack idea

5/13/2020

0 Comments

 
Date: Wednesday May 13 
 
Hello Families!  Have you ever sat and watched an ant? What busy creatures they are.

What is our theme? Creepy Crawlies


What is the lesson (overall purpose)?  
A brief look at the ant. Where they live and what they do.  Also making “Ants on a Log” for snack time.


MA Guidelines/Standards:
SED2 The young toddler responds to directions from familiar adults
SED6 The older toddler follows the directions of adults
PW36 The older toddler controls small muscles in the hand
CD55 The younger toddler shows an awareness of quantity
CD58 The older toddler shows and understanding of number concepts one, two, more and less
CD63 The older toddler uses simple tools to continue exploration


Learning Outcomes:
Ants may be small but boy do they work! Ants live in colonies underground. A colony is like a ‘neighborhood.’ There may be as many as 200,000 ants living in one colony. That’s a lot!  Each ant has their own job in the colony, just like your neighbors all have their own jobs. The head of the ant colony is the “Queen.” Her job is to lay eggs and have baby ants.  The other ants are “workers” Their jobs are to look for food for the colony, help to raise the baby ants,  take out the colony's trash, and defend the “neighborhood.” 


Songs, Books & Videos (Motivational Techniques)
https://youtu.be/cXUCUvcscXs Video: Children Learn About The Ant

https://youtu.be/2S__fbCGwOM Song: The Ants Go Marching

https://youtu.be/pCxY70kPDnM Video: Animanimals: Ant (A cute video showing how it’s ok to have fun while getting your work done too!)

https://youtu.be/4Hn35sfRzBk Story: If I Were An Ant

Materials: “Ants on a Log” snack

Celery stalks
Peanut butter
raisins
knife or spoon to spread the peanut butter


Activity (Procedure):  

You may need mom or dad’s help:

  • Start with your celery. Wash and cut celery stalks in half lengthwise. If they are especially tall, you may want to cut them in half width-wise as well.
  • Add peanut butter.  Take a spoonful of peanut butter and spread it on the cavity of the celery.
  • Add the “ants”.  Grab some raisins and press them into the peanut butter.
  • Enjoy!

Activity Wrap Up:
How many ants did you add to your log? Can you count them? 


How do I know what my child is learning? (Assessment)

Benefits of Cooking with Kids
  • Increases Language Development. As you cook, you are labeling ingredients which increases a child's vocabulary. ...
  • Enhances Fine Motor Skills. ...
  • Increases Math Ability. ...
  • Improves Reading Skills. ...
  • Introduces Kids to Scientific Concepts. ...
  • Teaches Life Skills. ...
  • Encourages Family Bonding.


How can you extend this activity? (Modifications)
https://www.pinterest.com/pin/192177109087577316/  Variations of Ants on a Log


Helpful Hints: (Pitfalls & Solutions)*
Sunbutter or WOWbutter can be substituted for the peanut butter and craisins can be used instead of raisins.


Picture
0 Comments

Creepy Crawlies: worm puppet

5/12/2020

0 Comments

 
Date: Tuesday May 12

Hello Families! On Monday, we looked at worms and did our own worm art using yarn and paint. Today let’s make a  pet worm puppet using our finger!

What is our theme? Creepy Crawlies


What is the lesson (overall purpose)?  
Using our finger to make a pet worm puppet.


MA Guidelines/Standards:
LC34 The younger toddler uses a growing number of words and puts them together in short phrases and simple questions
LC36 The older toddler communicates clearly enough to be understood by familiar and unfamiliar listeners
LC47 The older toddler demonstrates knowledge that a symbol can represent something else
PW33 The young toddler coordinates eye and hand movements
PW34 The young toddler controls small muscles in hand
PW35 The older toddler coordinates eye and and movements
PW36 The older toddler controls small muscles in hand


Learning Outcomes:
By creating a puppet your child will stimulate their imagination, improve fine motor skills, and boost their confidence with language as their worm communicates with you.


Songs, Books & Videos (Motivational Techniques)
https://youtu.be/Wtk-ZmYlxPA Song: Inch Worm (Ms Naomi remembers this from when she was a child!)

Materials: 
Small paper cup
Easter grass
glue
your finger!


Activity (Procedure):

Have mom or dad cut a hole in the bottom of the cup just big enough to poke your finger through. Cut some Easter grass into small pieces and glue them to the inside of the cup. Now poke your finger through the cup and pretend it’s a worm! Can you wiggle it around and make your worm dance? 


Activity Wrap Up:
Can you use your imagination to tell mom and dad a story about your pet worm? 

How do I know what my child is learning? (Assessment)
When your child engages in pretend (or dramatic) play, he is actively experimenting with the social and emotional roles of life. ... When your child pretends to be different characters, he has the experience of "walking in someone else's shoes," which helps teach the important moral development skill of empathy.


How can you extend this activity? (Modifications)
How about using markers and stickers to decorate the outside of your cup before adding the grass. Try drawing some flowers on the outside of the cup.


Helpful Hints: (Pitfalls & Solutions)
A piece of paper will work if there are no paper cups available.  The paper may tear so remind your child to be gentle when they poke their finger through. Placing tape around the hole may help it not tear as easily.

0 Comments

Creepy Crawlies: "worm" painting

5/11/2020

0 Comments

 
Hello Families! Have you ever looked underneath an old log or rock? What did you find? I bet there were lots of different kinds of bugs and creepy crawly things! I love looking for earthworms when I’m outside.   

What is our theme? Creepy Crawlies

What is the lesson (overall purpose)? 
Learning about the earthworm and painting with “worms.”
  

MA Guidelines/Standards:
AL11 The young toddler expands his exploration of the environment
AL13 The older toddler expands his exploration of the environment
CD61 The younger toddler discovers living things found in nature
CD64 The older toddler observes and identifies living things and begins to identify their basic needs
CD66 The younger toddler explores with sensory art materials and uses them to create visual effects
CD69 The older toddler creatively explores and experiments using a variety of sensory materials and art mediums

Learning Outcomes:
Worms are such interesting creepy crawlies. They have no eyes, legs or feet.  They move by crawling along the ground using their muscles and they can’t see so they feel the light through their skin.  Worms like to live in dark, wet places like under logs or rocks. They make tunnels in the ground using their mouths to chew away at the soil.


Songs, Books & Videos (Motivational Techniques)

https://youtu.be/A9cqWsPX97o Story: “The Mole and The Earthworm.

https://youtu.be/7O40A-6Jmt4 Video: Worms For Kids

https://www.youtube.com/watch?v=IlhAgkME0ME&list=UUv6xVX_RuUcNrmsq6MJ6a2Q Riley paints with ‘worms’


Materials:

Yarn or string
Assortment of paint colors
Paper plate to place your paint color choices
Paper
Paper towels or newspaper to cover the work surface


Activity (Procedure): Let’s paint with “worms!”

First cut your yarn or string into different lengths. Make some short and some long. Next prepare your work area by covering the table with the paper towel or newspaper. Place a medium size amount of paint on your paper plate. Now holding the very tip of the yarn, “drag” your yarn through the paint so that the paint covers the yarn. (It’s ok if it gets on your hands...it’ll wash off!) Now drag the paint covered yarn across your paper. Use a different piece of yarn for each paint color. You’re painting with a worm! Do this several times to make a cool worm design on your paper.

Activity Wrap Up:

As you were painting did you move your yarn in different directions across the paper so your “worm” was crawling? Did you choose to use more than one color paint? 


How do I know what my child is learning? (Assessment)

Process art allows a toddler the freedom to use the materials for exploring and experimenting.  Holding the yarn and “dragging” it through the paint is helping to strengthen fine motor skills.  If you have chosen to use more than one color paint, ask your child to identify the color they are using. Ask your child about their painting? How many worms are there? What are they doing? Where are they going? 

How can you extend this activity? (Modifications)
What other materials can you use  to add a different texture to your worm painting? Can you paint a log or stone on your painting? 


Helpful Hints: (Pitfalls & Solutions)

If you are unable to use string or yarn, you could always try painting with a pine needle, or how about a skinny twig? 

Process art with toddlers can get messy, but that’s ok! Using washable paint will make the activity a bit less stressful and at the end it’s a great activity to teach correct hand washing techniques. 

Since some children may not want to touch the wet yarn, try tying the yarn first to a stick or pencil and then allowing the child to drag it through the paint. 

0 Comments

Octopus snack!

5/7/2020

0 Comments

 
Our Lesson For the Week! 

What is the lesson?  An octopus inspired snack!

What is our theme? Ocean Creatures

MA Guidelines/Standards:
  1. PW37. The young toddler participates in physical care routines.
  2. PW34. The young toddler controls small muscles in hand.
  3. CD60. The younger toddler experiments with various wet and dry materials to discover their properties. 
  4. LC39. The older toddler participates in conversations.

Learning Outcomes:
Your child will learn about octopus. For example, they will learn that octopus have 8 legs when they help count the number of pretzels needed for their snack.

Songs,Books,Video(Motivational Techniques)
Books: The Rainbow fish
Educational videos: https://www.youtube.com/watch?v=abRPaXgJGQg
Song:https://www.youtube.com/watch?v=uG8uI1WGkO8 

Materials-
  • Pretzels
  • Raisins
  • Ritz
  • Peanut Butter /sun butter

Activity (Procedure):
  1. Lay two ritz crackers flat. Give the child a butter knife with peanut butter and demonstrate how to gently put peanut butter on one cracker. Help them put peanut butter on theirs
  2. Help your child count up to eight, laying out the pretzels
  3. Help your child lay the pretzels together at the bottom of one of the crackers
  4. Stick the other peanut-buttered cracker on top of the cracker/pretzels
  5. Add peanut butter to two raisins
  6. Add raisin eyes

Activity Wrap Up:
Talk about what they made. Talk about where octopus are found. Talk about how this is a healthy snack.

How do I know what my child is learning? 
(Assessment)
    Ask your child what they made. Ask your child how many legs their octopus has.


How can you extend this activity? (Modifications)
    You can extend this activity by talking about other healthy food choices.

Helpful Hints: (Pitfalls & Solutions)
    If your child doesn’t like peanut butter or sun butter, you can use cream cheese, frosting, or any other sticky spread.


Picture
Picture
Picture
0 Comments

Ocean Creatures: Snails

5/6/2020

0 Comments

 
What is our theme? Ocean Creatures


What is the lesson 
Making snails out of play-dough!
   
MA Guidelines/Standards:
  1. CD67. The younger toddler begins to use pretend and dramatic play to act out familiar scenes. 
  2. CD66. The younger toddler explores with sensory art materials and uses them to create visual effects.
  3. CD61. The younger toddler discovers living things found in nature
  4. PW50. The older toddler engages in a variety of physical activities

Learning Outcomes:
Your child will understand parts of the anatomy of a snail such as their body and their shell. Your child will be able to manipulate a shell, and use fine and gross motor skills when manipulating playdough.

Songs,Books,Video(Motivational Techniques)
Song: https://www.youtube.com/watch?v=_-rHZxArKOM 
Song: https://www.youtube.com/watch?v=3PDeR3n0vas 
Song: https://www.youtube.com/watch?v=dqU-vrZeKCs 
Song: https://www.youtube.com/watch?v=rNIyVye8fYo 
Educational video: https://www.youtube.com/watch?v=pRmChG3Jf_Q 

Materials-
  • Playdough
  • Shells

Activity (Procedure):
  1. Start by helping your child roll one piece of playdough into a big ball. This will be stuffed into the shell to connect it to the snail body
  2. Help your child roll a piece of playdough into a snake shaped piece, this will connect to the shell as the body
  3. Help your child roll a smaller call of playdough to act as the head of the snail.
  4. Connect all your pieces of playdough together, and play!

Activity Wrap Up:
    I recommend making at least two snails. Once your snails are out together, you can easily extend this activity. Play with your child and make your snails talk to each other. Talk about where snails really live, or pretend they are living somewhere imaginary!

How do I know what my child is learning? 
(Assessment)
    You will know your child is learning if they can identify this animal as a snail, even though it's a more abstract construction.

How can you extend this activity? (Modifications)
    Next time you are at the beach, observe snails moving in the water!

Helpful Hints: (Pitfalls & Solutions)
    If making playdough isn’t an option, it is almost always readily available at the dollar tree.


Picture
Picture
0 Comments

Ocean creatures: whales!

5/5/2020

0 Comments

 
Hello Families! There are so many creatures that live in our oceans. The largest animal is the whale. Let’s look at some different kinds of whales and then play “Whale Hokey-Pokey!”


What is our theme? Ocean Creatures

What is the lesson (overall purpose)?  
To learn about whales.


MA Guidelines/Standards:
LC28 The younger toddler responds to action words by performing the action
CD65 The younger toddler responds and participates in music, rhythm and songs
CD68 The older toddler responds to and participates in music and dance with increasing skill in rhythm and movement


Learning Outcomes:

Whales are the largest animals on the planet. They live in the ocean and can swim great distances. Whales have flippers and a huge tail that helps them to swim. Whales can swim underwater for a long time but must come up to the surface to breath air. On the top of their heads they have a blowhole that helps them to breath. Whales “talk” to each other by singing songs using their blowholes. Just like our voices sound different, no two whales have the same song.


Songs, Books & Videos (Motivational Techniques)

https://youtu.be/I9qlhNU1ATE Whales (Learning video)

https://youtu.be/W5Trznre92c Whale song

https://youtu.be/QodRU8lav7s Whale (Cute wordless story)

https://youtu.be/irQa3UDV_AM Baby Beluga by Raffi

Materials:

All you need for today’s activity are your dancing shoes!


Activity (Procedure): Whale Hokey Pokey! 

Put your left flipper in
Put your left flipper out
Put your left flipper in and shake it all about
Do the whale pokey and swim yourself around
That’s what it’s all about!

Put your right flipper in
Put your right flipper out
Put your right flipper in and shake it all about
Do the whale pokey and swim yourself around
That’s what it’s all about!

Continue song using different whale parts. For example, tail, blow hole, mouth, tongue, whole body.


Activity Wrap Up:
What is your favorite kind of whale? Have you ever seen one? 

Can you “write” a whale song to sing? What would your whale song sound like?


How do I know what my child is learning? (Assessment)
Can your child name the parts of a whale: Flippers, tail, blowhole?  Can they tell you where they live? 

Ask your child how whales talk to each other. 


How can you extend this activity? (Modifications)
Try google searching whale images to see the many various species of whales. 

Here is another educational video:
https://youtu.be/kFMh8roaipU Learn about whales

Helpful Hints: (Pitfalls & Solutions)
https://youtu.be/XuKMDl7meO4 The Hokey Pokey (music only)

​
0 Comments

Ocean Creatures - octopus

5/4/2020

0 Comments

 
​Hello Families! Last week we talked about the beach and some things we found at the beach. This week let’s talk about Ocean creatures, starting with the Octopus!  There is a fun octopus craft using an empty toilet paper roll at the end of the lesson.

What is our theme? Ocean Creatures

What is the lesson (overall purpose)? 
Learning about our 8 legged ocean friend the Octopus.


MA Guidelines/Standards:
CD60 The younger toddler experiments with various wet and dry materials to discover their properties
CD66 The younger toddler explores with sensory art materials and uses them to create visual effects
CD69 The older toddler creatively explores and experiments using a variety of sensory materials and art mediums


Learning Outcomes:
An octopus is an eight legged creature that lives in the ocean. Octopus legs are called tentacles. An octopus swims in order to get from one place to another. 


Songs, Books & Videos (Motivational Techniques)

https://youtu.be/oxawhfXGGt8 Video: Real footage of Octopus swimming.

https://youtu.be/JhEbBiVxH9o Music: The Octopus Song

https://www.youtube.com/watch?v=7ZvxQBh5jdw&list=UUv6xVX_RuUcNrmsq6MJ6a2Q Story: Jolly Olly Octopus read by Ms. Naomi

https://www.busymommymedia.com/toilet-paper-roll-octopus-craft/ Toilet Paper roll Octopus


Materials:
  • Empty toilet paper roll
  • Waterproof paint
  • Paintbrush
  • Googly eyes 
  • Scissors
Activity (Procedure):

Have mom or dad cut the toilet paper tube about 2 inches from the bottom of the tube. Do this all the way around the tube so that you make 8 tentacles. (legs) Bend each tentacle in an outward direction so the octopus can stand on its own. Now you can paint your octopus any color you choose.  When the paint dries add googly eyes and any other decorations you want.


Activity Wrap Up:

Try pointing to each tentacle (leg) and counting them from 1-8.

What color did you choose to paint your octopus? 

Take a picture of your octopus and send it to me so I can see your work!
 

How do I know what my child is learning? (Assessment) 

Can your child count the tentacles from 1-8?
Ask your child where the octopus lives?

How does it get from one place to another?


How can you extend this activity? (Modifications): 

Try adding some string or yarn to the top of your octopus and then it can hang in a special place in your house!


Helpful Hints: (Pitfalls & Solutions): 

If you don’t have an empty toilet tissue tube, you can easily roll up a piece of construction paper or plain white paper into a tube shape for the octopus body.

No paint? Crayons or markers will do the job? Drawing on the eyes is ok if you don’t have googly eyes. 

0 Comments
<<Previous
Forward>>

    Author

    Ms. Naomi & Ms. Haley
    Toddler Team

    Archives

    June 2020
    May 2020
    April 2020
    March 2020

    Categories

    All

    RSS Feed

Powered by Create your own unique website with customizable templates.