WELCOME THE LAUREL SCHOOL TODDLER, PRESCHOOL & PRE-KINDERGARTEN VIRTUAL CLASSROOMS
  • Welcome
  • Toddler
    • Ms. Naomi & Ms. Haley
    • Ms. Margo & Ms. Tonia
  • Preschool
    • Ms. Rachel
    • Ms. Julia
    • Ms. Taisha
    • Ms. Amanda
    • You Tube Stories & Songs
  • Pre-Kindergarten
    • Ms. Lynn
    • Ms. Nancy
  • Ms. Sunny's Corner
  • Student & Family Shares!
  • Contact

Ms. Rachel's 
home Learning resources


Mud Kitchen

4/30/2020

0 Comments

 
What is our theme? 
Technology (STEM), sensory

What is the lesson (overall purpose)?  
Provide a mud kitchen for your child/children to play and explore using both their senses and a variety of tools. 

MA Guidelines/Standards:
APL 1: The child will demonstrate initiative, self-direction, and independence.
APL 2: The child will demonstrate eagerness and curiosity as a learner.
PreK-LS1-3 (MA). Use their five senses in their exploration and play to gather information.


Learning Outcomes:

  • Students will observe a simple transformation of natural materials. 
  • Students will show initiative, curiosity, creativity and imagination. 
  • Students will engage their senses while they explore natural materials.
  • Students will practice important technology task skills:  scooping, pouring, sorting, rolling, lifting, etc. 
  • Students will participate in dramatic play.


Songs, Books & Videos (Motivational Techniques)
Listen to the book read aloud “Mud Pie Annie” by Dana Shafer and Sue Buchanan
https://www.youtube.com/watch?v=5N2LahDuNwc

Materials 
  • Something to watch book read aloud
  • Dirt and water! Mix in a bowl. As much or as little as you’d like. Show your kids this process to make mud.

(THE REST ARE OPTIONAL)
  • Pots and pans
(that you don’t mind getting dirty or borrowed for a period of time)
  • Mixing spoons
  • Spatulas
  • whisks
  • Measuring cups
  • Straining tools 
  • bowls/plates
  • Cupcake pan
  • Twigs/sticks
  • grass 
  • acorns
  • pinecones


Activity (Procedure):
Before activity: Set up your “Mud Kitchen” area with chosen materials. 
I recommend a good, safe spot outside that requires easy clean up. 

  • When kitchen is ready, allow your child to listen to the book read aloud, “Mud Pie Annie.” 
  • Tell your child they will be able to make mud pies and other mud food too!
  • Make mud with your child


Activity Wrap Up: 

Ask your child to show you things they made! How did they make it? 

How do I know what my child is learning? (Assessment)
  • Is my child engaged in pretend play?
  • Does my child understand that mud is a mixture of water and dirt?
  • Is my child practicing skills of technology? 


How can you extend this activity? (Modifications)
Ask your child to help clean up! 
  • Scrape out mud into good spot in garden/yard.
  • Bring tools to the kitchen sink. 
  • Allow them to help you rinse off the dirty tools! 

Helpful Hints: (Pitfalls & Solutions)

Have mud ready for your child if this is easier!
​
0 Comments

Empty Frame

4/29/2020

0 Comments

 
Date: 4/21

Empty Frame

What is our theme? 
S.T.E.A.M.

What is the lesson (overall purpose)?  
To provide an open space for a child to investigate, sort and arrange natural materials that intrigue the senses. 

MA Guidelines/Standards:
APL 1: The child will demonstrate initiative, self-direction, and independence.
APL 2: The child will demonstrate eagerness and curiosity as a learner.
PreK-LS1-3 (MA). Use their five senses in their exploration and play to gather information.
PreK-PS1-2 (MA). Investigate natural and human-made objects to describe, compare, sort and classify objects based on observable physical characteristics, uses, and whether something is manufactured or occurs in nature.

Learning Outcomes:

Students will show initiative, curiosity, and creativity. 
Students will engage their senses while they explore natural materials.

Songs, Books & Videos (Motivational Techniques)
I love to encourage playing soft music in the background. :)  
“Cozy Acoustic Morning” is one of my favorite playlists to use on spotify!

Materials
  • Anything that could be used as an “empty frame”.
 For example: hoola hoop, mason jar rings, a lattice, a chalk drawn frame outside, or of course an empty picture frame you may have around the house. (Collect/make as many as you can for this activity! Alway fun to provide options)
  • Bag to collect natural materials
  • Bowls to put natural materials into for your child. 

Activity (Procedure):

  • Either gather natural materials with your child or do so for your child before beginning activity.
  • Gather materials that would engage the senses. Think smell, texture, colors, shape, and size.
  • Put materials into bowls next to your empty frames. 
  • Provide a visual rather than a verbal cue for your child on what to do here. You can do this by creating your own frame. Maybe you create an interesting pattern or maybe you order pine cones by size across your frame.
  • Let your child follow with their own frame.


Activity Wrap Up: 
Look with awe at your child’s work. Ask your child to tell you about what they did.

How do I know what my child is learning? (Assessment)

Things to look for: 
  • arrangement of materials by color, size, and shape. 
  • Do they experiment with building or stacking?
  • Look for the inventive or unusual ways children use the frames or materials. Look for ways you may not have anticipated. 
  • Then look deeper, ask yourself what caused them to do that, what do they know about the material, and also ask, are they applying knowledge they have to a new situation.
  • Listen for the ways children describe and identify materials. 

How can you extend this activity? (Modifications)
After your child has had time to explore independently, feel free to ask your child questions like:
  • Can you find all the green items?
  • Can you find all the small items? All the larger items?
  • Can you build a tower/house with any of your items?
  • Can you make another picture with your items?

Helpful Hints: (Pitfalls & Solutions)


0 Comments

Seed Letters

4/28/2020

0 Comments

 
What is our theme? 
Alphabet letters, fine motor

What is the lesson (overall purpose)?  
To give the student an opportunity to practice forming letter shapes using natural materials. 

MA Guidelines/Standards:
SEL3: The child will demonstrate self- efficiency (confidence/competence).
F.K. 1. Demonstrate understanding of the organization and basic features of print.
d. Recognize and name all upper- and lowercase letters of the alphabet.

Learning Outcomes:
  • Students will show self-efficiency skills.
  • Students will observe and become more familiar with the alphabet letters. 

Songs, Books & Videos (Motivational Techniques)
“Chicka Chicka Boom Boom” by by Bill Martin, Jr. and John Archambault
book read aloud: Posted Below!


Materials:
  • Computer/device to watch youtube link
  • Paper (or cardboard)
  • Marker
  • Bird seed (or something small/similar: corn kernels, dried beans)


Activity (Procedure):
  • Prepare for your child each letter (capital and lower case) written out, each on its own separate paper. Feel free to cut paper into smaller size and use both sides of the paper to be green!
  • Model for your child how to trace a few letters with the bird seed (or dried beans/corn kernels/etc).
  • Allow your child to finish the remainder. 


Activity Wrap Up:
Review the names of each letter.


How do I know what my child is learning? (Assessment)
  • Is my child picking up bird seed with his/her index finger and thumb?
  • Is my child interested in tracing the letter shapes?
  • Does my child remember the letter names?
  • Which letters are they struggling with?

How can you extend this activity? (Modifications)
  • While reviewing the letter names, ask if they know what sound the letter makes? Make the sound for them and repeat it. After you practice the sound, give your child examples of words that start with that letter. 
  • Find the letters in their name. Trace those letters.

Helpful Hints: (Pitfalls & Solutions)
Your child may lose interest in completing the entire alphabet, no worries. Save the rest for an activity to do later!

0 Comments

Reflection, art

4/27/2020

0 Comments

 
Reflection Art

What is our theme? 
Reflection, Art

What is the lesson (overall purpose)?  

Students will use a variety of art tools to draw and reflect on a happy recent experience.

MA Guidelines/Standards:

SL.PK.4. Describe personal experiences; tell stories.
W.K.3. Use a combination of drawing, dictating, and writing to narrate a single event or experience, or several loosely linked events or experiences; sequence the narrative appropriately and provide a reaction to what it describes.
W.PK.2. Use a combination of dictating and drawing to supply information about a topic.
SEL7: The child will demonstrate the ability to communicate with others in a variety of ways.

Learning Outcomes:

  • Students will recall and reflect on a recent experience.
  • Students will draw their representation of this experience. 

Songs, Books & Videos (Motivational Techniques)

I often like to play gentle background music while kids are working on art projects. 


Materials
  • Paper or cardboard
  • Art tools: crayons, coloring pencils, paint and brush (if you so dare!)


Activity (Procedure):

  • Ask your child to think about something they have done recently that made them happy. 
  • Ask them to share with you what they’re thinking about.
  • Now ask them to draw it!

Activity Wrap Up: 
  • When they’re finished, look with awe at their drawing and ask your child “Tell me what’s happening here?” 
  • Write down their response. (either on their drawing or a seperate paper)


How do I know what my child is learning? (Assessment)
  • Is my child able to recall a happy experience?
  • Does my child go into detail about such experience or link it to other experiences?
  • Does my child draw a representation of this experience? 

How can you extend this activity? (Modifications)
Encourage the conversation about their experience by asking good questions:
  • What happened when…?
  • What happened before/after…?
  • What did it look/feel/sound/taste/smell like?
  • What did you use to make it?
  • Why do you think…?
  • What happened first, second, third, etc.?
  • Is there anything that you would change? If so, why?
  • Why is this important?


​
0 Comments

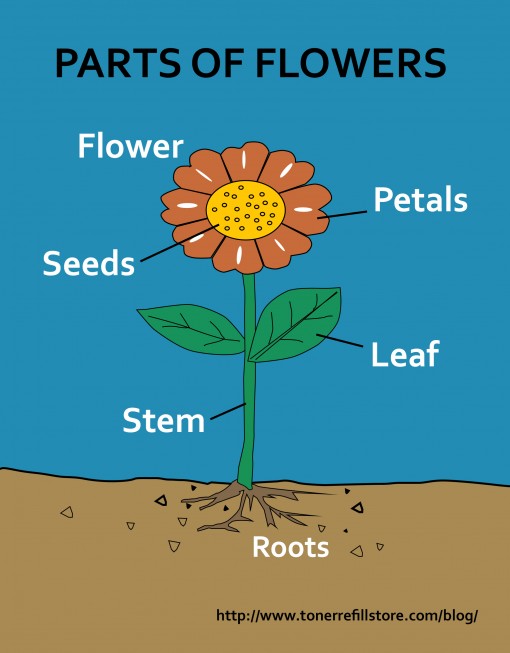
Parts of a Flower Sort

4/24/2020

0 Comments

 
Our Lessons For the Week:  Parts of a Flower Sort

What is our theme? 
Science, Math, Parts of a Flower

What is the lesson (overall purpose)?  
Child will learn about the parts of a flower. Child will cut and sort parts of a flower into separate bowls. Students will practice fine motor skills while cutting flowers into different parts.

MA Guidelines/Standards:
PreK-LS1-3 (MA). Use their five senses in their exploration and play to gather information.
PK.MD.3. Sort, categorize, and classify objects by more than one attribute.

Learning Outcomes:
  • Student will use their senses to explore the parts of a flower. 
  • Student will safely cut flower into different parts (Flower petals, stem, leaves, roots?).
  • Student will correctly sort of the different parts of the flower into individual bowls.

Songs, Books & Videos (Motivational Techniques)

Parts of a flower song https://www.youtube.com/watch?v=HuKa57OJ_iA

Parts of a flower Handout** 

Materials
  • Computer/device to watch youtube link
  • Child friendly scissors
  • Three bowls labeled “Petals”, “Stem”, “Leaves”

Activity (Procedure):

  • Let your child watch/listen to the “Parts of a Flower” song
  • Review the parts of a flower sheet on the attached handout. Point out each part with your child.
  • Ask your child to collect some flowers OR have flowers pre-picked for your child.
  • Model how to cut one flower into its different parts. 
  • Model how to sort each part into the correct bowl. 
  • Review scissor safety and ask your child to finish cutting and sorting the rest of the flowers.

Activity Wrap Up: 
Look to see if your child was able to sort the parts of the flower correctly. Praise them for their work.
Finally, review the parts of the flower one last time.

How do I know what my child is learning? (Assessment)
  • Is my child interested in cutting the flowers?
  • Is my child interested in sorting the flowers?
  • Is my child able to label the parts of the flower?
  • Is my child able to correctly sort the parts of the flower?

How can you extend this activity? (Modifications)

Ask your child to draw their own flower. Remind them to include each part of the flower. Ask them to point out and verbally label each part when they are done. 

Helpful Hints: (Pitfalls & Solutions)

Some students may need help correctly sorting the parts of the flower into the correct bowls. While labeling the bowls for your child, maybe include a small picture or drawing of that part of the flower (along with the written name). 
This may help your child remember where they are supposed to place each part while sorting.


Picture
0 Comments

Rain Drop Alphabet Jump

4/22/2020

0 Comments

 
Our Lessons For the Week:  Rain Drop Alphabet Jump 
Students will review letters while jumping on “rain puddles”.

What is our theme? 
Alphabet review, Rain, Gross Motor

What is the lesson (overall purpose)?  
Students will review letters while working on gross motor skills (jumping). 

MA Guidelines/Standards:
F.PK.1: With guidance and support, demonstrate understanding of the organization and basic features of printed and written text: books, words, letters, and the alphabet.


Learning Outcomes:
  • The student will review and recognize different letters of the alphabet.

Songs, Books & Videos (Motivational Techniques)

Youtube song and book read aloud, “Singing in the Rain”
https://www.youtube.com/watch?v=TW87zw1NqOk


Materials
  • Computer/device to watch youtube link
  • Paper “puddles” or “raindrops”
(large enough for child to jump on)
  • Marker (to write alphabet letters on puddles)
  • Tape (optional to tape down puddles)
  • Child’s rainboots! (optional)

Activity (Procedure):

  • Have puddles set up on the floor with one letter written on each puddle.
  • Begin activity by watching/listening to youtube link.
  • Ask your child to put their rainboots on (optional!) because they’re about to go alphabet puddle jumping!
  • Allow them to hop around for a few minutes.
  • Now tell them they will get a 1 points for every letter they can tell you! And a 1/2 point for every letter they need help on.
  • Add total up. Celebrate!
  • Every time you play this game, see if your child can get a higher score!


Activity Wrap Up: 
Review the letters on each puddle.

How do I know what my child is learning? (Assessment)
  • Is my child interested in hopping on the puddles?
  • Is my child recognizing any letters?
  • Does my child need more review with letter names?

How can you extend this activity? (Modifications)

Extend this activity by finding the letters of their name! Can they spell their name out?

Helpful Hints: (Pitfalls & Solutions)

Most students are still learning the letter names and will most likely need your help remembering letter names! Totally to be expected. When they give you that look of ‘Help me remember this letter…?’ offer the sound of the letter before you give them the answer! 

Exposure to the alphabet and review is everything at this age. Mastery recognition is not expected by any means.  


0 Comments

Flower Hunt

4/21/2020

0 Comments

 
Our Lessons For the Week:  Flower Hunt

Students will talk about how flowers are a result of all this spring rain we are experiencing. Students will pick their own flowers, describe them and count them. 

What is our theme? 
Science, Math, Spring, Flowers

What is the lesson (overall purpose)?  
  • Students will talk about how flowers are a result of all this spring rain we are experiencing.
  • Students will describe flowers they pick: color, size, smell
  • Students will count how many flowers they pick.

MA Guidelines/Standards:
PreK-ESS2-5 (MA). Describe how local weather changes from day to day and over the seasons and recognize patterns in those changes.
PreK-ESS2-6 (MA). Provide examples of the impact of weather on living things.
PreK-LS1-3 (MA). Use their five senses in their exploration and play to gather information.
PK.CC.4 Count many kinds of concrete objects and actions up to ten, recognizing the “one more”, “one less” patterns, using one-to-one correspondence, and accurately count as many as seven things in a scattered configuration.

Learning Outcomes:
  • Students will better understand that flowers begin to bloom during the spring season.
  • Students will use their senses to describe the flowers they pick.
  • Students will count the correct number of flowers that they picked.

Songs, Books & Videos (Motivational Techniques)

Book read aloud on youtube: “Fletcher and the Springtime Blossoms” by Julia Rawlinson 
https://www.youtube.com/watch?v=tG5JN72bAEU

Materials
  • Computer/device to watch youtube link
  • Child friendly scissors (optional - if child needs help picking certain flowers)

Activity (Procedure):
  • Start by watching the book read aloud, “Fletcher and the Springtime Blossoms” by Julia Rawlinson 
  • Ask your child to go outside and collect their own spring flowers.
  • When your child brings back their flowers, ask them to explore their flower: look at it with their eyes, smell it with their nose, touch it with their fingers.
  • Ask your child to describe what they’re observing.
  • Ask your child to count how many flowers they picked. 
  • Put them in a vase or small cup of water if you can! 

Activity Wrap Up: 
Review how flowers bloom in the springtime. Talk about why it’s so important for it to rain during the spring so that the flowers can grow!

How do I know what my child is learning? (Assessment)
  • Is my child interested in investigating the flowers with their senses?
  • Is my child able to describe their flowers?
  • Is my child able to count their flowers correctly?

How can you extend this activity? (Modifications)
Ask your child how many flowers would you have if I picked one more flower for you? How many flowers would you have if I took one flower away?


Helpful Hints: (Pitfalls & Solutions):  Your child may need help picking their flowers. Have child friendly scissors ready for them to use as a tool to cut their flower. 


0 Comments

Rain Cloud Experiment

4/21/2020

0 Comments

 
Our Lessons For the Week:  Rain Cloud Experiment

Students will learn more about clouds and do a fun, easy experiment to see how clouds work. 

What is our theme? 
Science, Spring, Rain Clouds, Water Cycle

What is the lesson (overall purpose)?  
Students will learn a bit more about the water cycle and clouds. They will be given an opportunity to experiment with how clouds and rain work. 

MA Guidelines/Standards:
PreK-ESS2-5 (MA). Describe how local weather changes from day to day and over the seasons and recognize patterns in those changes.
 
Clarification Statement: Descriptions of the weather can include sunny, cloudy, rainy, warm, windy, and snowy.
 
Learning Outcomes:

  • The student will learn more about the water cycle, clouds and how clouds make rain. 
  • The student will engage in a science experiment. 

Songs, Books & Videos (Motivational Techniques)

Youtube link, “The Water Cycle | The Dr. Binocs Show”
https://www.youtube.com/watch?v=ncORPosDrjI

Materials
  • Computer/device to watch youtube link
  • Glass of water (make sure it is glass so you can see the “rain” fall)
  • Shaving cream (paper towel will work if you don’t have shaving cream)
  • Food coloring

Activity (Procedure):

Begin activity by talking about clouds and looking at them outside or through the window. Follow up this discussion by watching the water cycle youtube link.

Now tell your child they will be conducting an experiment to see how rain falls from a cloud!
  • Fill the cup with water (air)
  • Add a thin layer of shaving cream (clouds – water vapor)
    (Or use a paper towel across the top of the cup. Use rubber band to hold it in place.)
  • Allow child to place drops of blue food coloring on the top of the shaving cream (water droplets)
  • Wait for the “rain” to fall
For this experiment it is important to remind learners that this activity shows how the water gets heavier on the top of the cloud and gravity makes it fall as rain.  Let them know that we use the shaving cream and food coloring to represent the different forms of water we can easily see.

Activity Wrap Up: 
Review the water cycle.
Review what happens when clouds get heavy with water droplets. 


How do I know what my child is learning? (Assessment)
  • Is my child showing interest in this activity?
  • Does my child understand why clouds fill up with water?
  • Does my child understand why rain falls from clouds?

How can you extend this activity? (Modifications)

Talk about what happens to water droplets when the air is freezing. 

Helpful Hints: (Pitfalls & Solutions)

Your child may need a few discussions about how rain forms in clouds before fully grasping this concept. Feel free to repeat this fun activity and watch the learning youtube link as many times as you’d like!

​
0 Comments

simple math with rain!

4/20/2020

0 Comments

 
Our Lessons For the Week: Addition Clouds

This lesson plan is working on simple addition while talking about spring rain!

What is our theme? 
Math, Spring

What is the lesson (overall purpose)?  
Students will work on simple addition and subtraction equations. Equations will be written on paper “clouds.” The student will add “raindrops” under the cloud to represent correct numbers in the equation. 
Student will find the sum or difference.

MA Guidelines/Standards:

PK.OA.1. Use concrete objects to model real-world addition (putting together) and subtraction (taking away) problems up through five.
PK.CC.2. Recognize and name written numerals 0–10.
PK.CC.3. Understand the relationships between numerals and quantities up to ten.

Learning Outcomes:
  • The student will understand how many rain drop dots are needed to represent each addend or subtrahend.
  • The student will be able to count the total number of addends/subtrahend(raindrops) to determine the sum or difference. 

Songs, Books & Videos (Motivational Techniques)

“Let it Rain” by MaryAnne Cocca-Leffler book read aloud: https://www.youtube.com/watch?v=_pGZDROHpxI


Materials
  • Computer/device to watch youtube link
  • Paper to cut out cloud shapes
  • Marker (to write out equations on clouds)
  • Something concrete to represent rain drops. Example: pebbles, beads, dried beans, cheerios, corn kernels, cut out blue paper “rain drops” 

Activity (Procedure):

Before beginning activity, prepare your materials and write out equations on to the clouds you’ve created for your child to work on. Use numbers 1-5. Examples: 1+4, 2+3, 5+5, 5-1,4-2. Have “raindrops” ready and nearby for your child to use.  

  • Start by listening to the book read aloud link. Maybe watch it twice. 
  • After the story, talk about how and why we see so much rain in the spring time. 
  • Next, show your child the cloud equations. Start by modeling how to do the addition equations. Point out the additon symbol. 
  • Ask your child to add the first number of raindrops under the cloud. Next, add the second number.
  • How many raindrops in total? Have your child count them all to find the answer.
  • Complete all addition clouds.
  • Now do the subtraction clouds. Model for your child. 
  • Ask your child to add the first number under the clouds. Now, take away the second number of rain drops. 
  • How many raindrops are left? Ask your child to count the raindrops left.
  • Complete all subtraction equations. 

Activity Wrap Up: 
After modeling the first few equations, allow your child to finish the remaining equations on their own. If they need your help, feel free to step in.

How do I know what my child is learning? (Assessment)
  • Is my child showing interest in this activity?
  • Is my child able to add correct number of raindrops?
  • Is my child able to find the difference with the subtraction equations?
  • Where does my child need practice?
  • Where does my child need to be challenged?

How can you extend this activity? (Modifications)
Extend this activity by giving your child more challenging equations. Include numbers 6-10.
 

Helpful Hints: (Pitfalls & Solutions)
Your child may confuse addition equations for subtraction equations. Make sure to model the difference between the two. Talk aloud while modeling. Example “I am now going to take away 3” or “I am now going to add 3.” “How many raindrops do I have now?” “How many raindrops do I have in total?”

Make sure to circle the symbols to show where you can tell the difference between addition and subtraction. 

​
0 Comments

Making a butterfly Book - 4/13/20

4/13/2020

0 Comments

 
This activity engages children in their creativity to tell stories!  Have fun making your own book about caterpillars and butterflies!


What is our theme? Science, Language Arts, Caterpillar/Butterflies

What is the lesson (overall purpose)?  
Allow your child to get creative and make their own story about a caterpillar becoming a butterfly. 

MA Guidelines/Standards:
W.PK.2. Use a combination of dictating and drawing to supply information about a topic.
W.PK.3. Use a combination of dictating and drawing to tell a story
SL.PK.6. Speak audibly and express thoughts, feelings, and ideas.


Learning Outcomes:

Student will recall information about caterpillars and butterflies.

Students will create their very own story - pictures and words!


Songs, Books & Videos (Motivational Techniques)
A new version from Lesson 4!
 “The Very Hungry Caterpillar” by Eric Carle (Listed Below)


Materials
  • white paper folded in half to create a “book”
  • Staple (along edge if you’d like)
  • Crayons, markers, colored pencils
  • Pen

Activity (Procedure):

  • After watching the read aloud link of “The Very Hungry Caterpillar”, tell your child they are now going to make their very own story about a caterpillar and butterflies. 
  • Give them the blank folder paper book and coloring tools. Skip the cover and ask them to start by filling in the first page of the story. When they’re done ask them to tell you what this page says. Dictate (write down) exactly what they tell you.
  •  Move on to the second page, repeat, etc. 
  • When each page of their story is complete with a drawing and dictation, ask them to draw a title page and give it a Title. 
  • Read their story!


Activity Wrap Up:
Read their story! Congratulate them on a successful book!

How do I know what my child is learning? (Assessment)
  • Is my child able to tell me what is happening in their pictures?
  • Is their story related to caterpillars/butterflies?
  • Does their story show they are recalling the butterfly life cycle? 

How can you extend this activity? (Modifications)
Make as many books as you’d like!


Helpful Hints: (Pitfalls & Solutions)
Students may not want to write their story about caterpillars or butterflies. Not a big deal. I would rather them create a story on something they’re interested in than something forced. Let them get creative!


​
0 Comments
<<Previous

    Author

    Ms. Rachel 
    ​Preschool Teacher 

    Archives

    June 2020
    May 2020
    April 2020
    March 2020

    Categories

    All

    RSS Feed

Powered by Create your own unique website with customizable templates.