This simple technique uses heat and evaporation to create negative images of objects placed on painted fabric!
What is our theme? Acrylic Paint Sun Prints
What is the lesson (overall purpose)?
To take an artistic approach to science and to continue on with our lesson of pollination and flowers.
MA Guidelines/Standards:
SEL12: The child will demonstrate the ability to reflect on and evaluate the results of his/her actions and decisions.
APL 1: The child will demonstrate initiative, self-direction, and independence.
APL 2: The child will demonstrate eagerness and curiosity as a learner.
Learning Outcomes:
To witness how powerful the sun is.
Songs, Books & Videos (Motivational Techniques)
https://youtu.be/iRLqAhaniyg - video about evaporation.
Materials:
Activity (Procedure):
Activity Wrap Up:
Talk about how water evaporates from the exposed surface of the fabric as it is heated by infrared energy from the sun. The covered areas of the fabric are essentially protected from evaporation, making them wetter than the exposed fabric. Water diffuses from the covered fabric to the drier exposed fabric, pulling the paint pigments along with it. The trick is to start with enough water to pull all the pigment out from under the items being printed. Through a little experimentation, I learned that using wet fabric and watered-down paint gives the sharpest prints.
How do I know what my child is learning? (Assessment)
Watch the evaporation video and discuss what you saw. Talk about how this happened to your picture.
How can you extend this activity? (Modifications)
While you wait for it to dry you can paint with water
On the pavement and watch to see the sun make it disappear when it dries.
Helpful Hints: (Pitfalls & Solutions)
Don't try this on a windy day.
Have a spray bottle of water handy. Mist the fabric lightly if it starts drying before you've arranged the leaves and flowers.
Darker colored paints make the best prints because they give the most contrast with the white fabric.
What is our theme? Acrylic Paint Sun Prints
What is the lesson (overall purpose)?
To take an artistic approach to science and to continue on with our lesson of pollination and flowers.
MA Guidelines/Standards:
SEL12: The child will demonstrate the ability to reflect on and evaluate the results of his/her actions and decisions.
APL 1: The child will demonstrate initiative, self-direction, and independence.
APL 2: The child will demonstrate eagerness and curiosity as a learner.
Learning Outcomes:
To witness how powerful the sun is.
Songs, Books & Videos (Motivational Techniques)
https://youtu.be/iRLqAhaniyg - video about evaporation.
Materials:
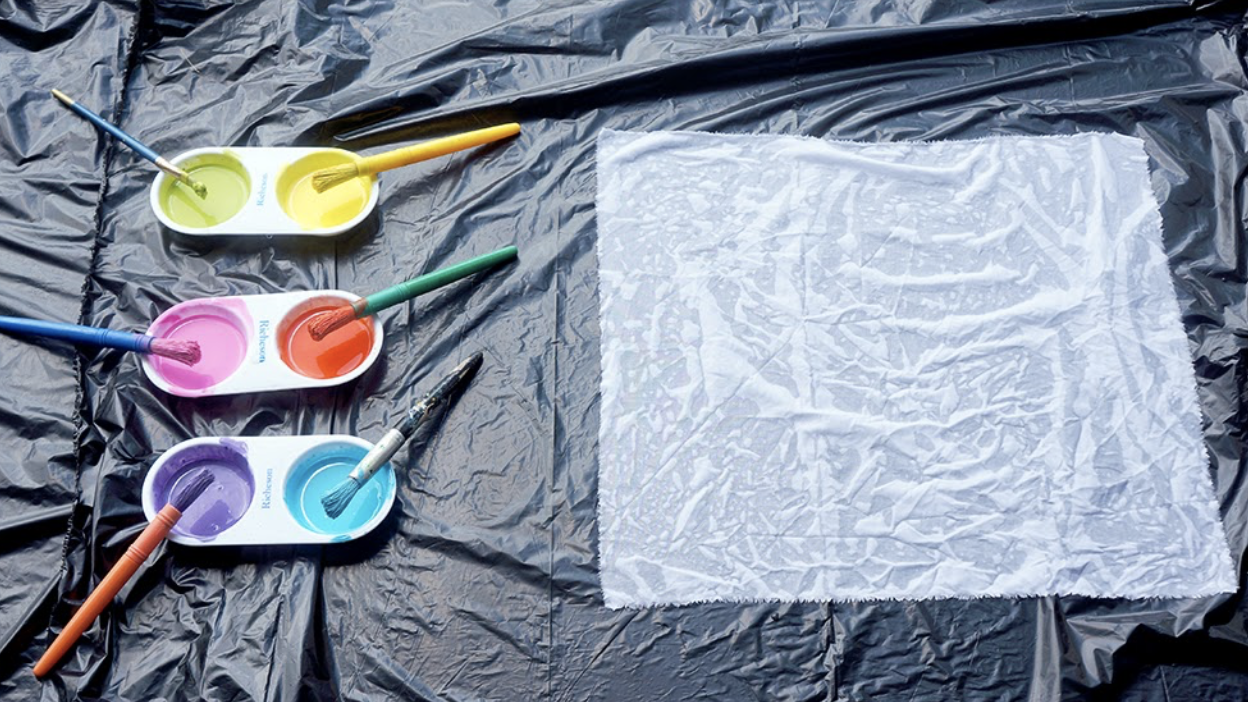
- white 100% cotton fabric
- acrylic craft paints (darker colors work best)
- paint brushes
- water
- a tarp or plastic trash bag
- flowers, leaves, etc.
Activity (Procedure):
- Gather your supplies and head outdoors on a warm, sunny day. Spread out a tarp or plastic bag to protect your driveway. Wet the fabric, squeezing it out just enough that it no longer drips, and lay it flat on the tarp. Thin the paints about 1:1 with water.
- Paint the fabric.
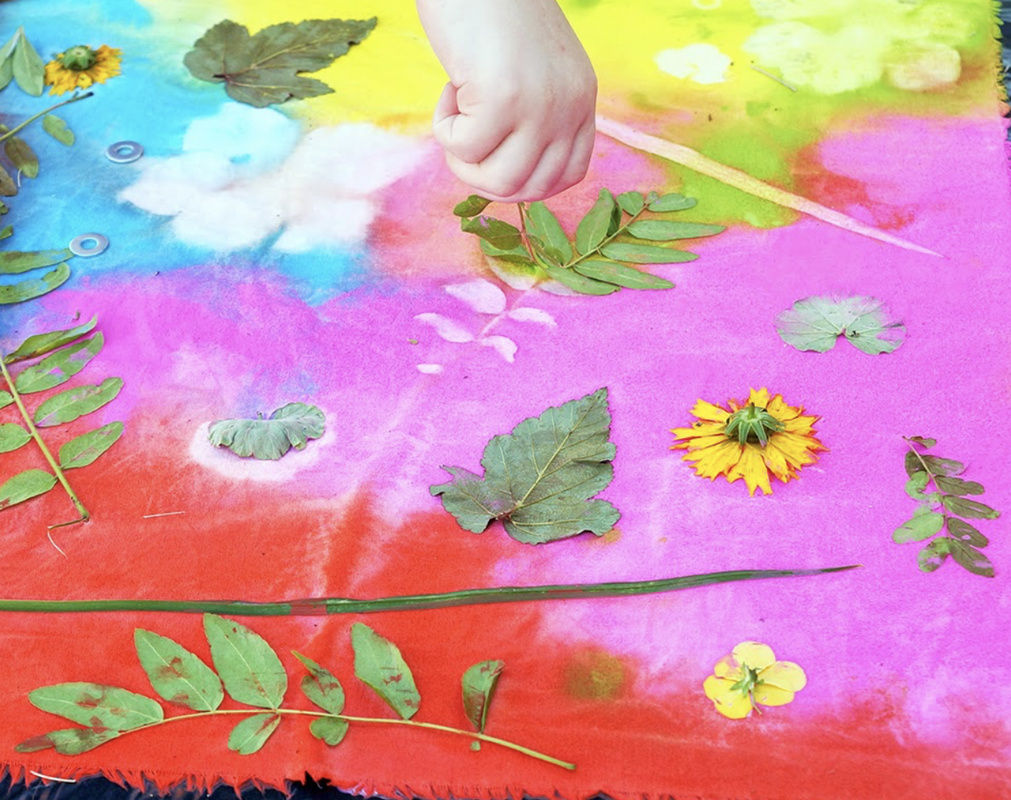
- Gather flowers and leaves with interesting silhouettes. Or if you prefer, household items such as washers, keys, toys, office supplies, kitchen utensils, sewing notions, foam shapes, etc. You will get the best results from objects that lie flat and make good contact with the fabric around their edges. For example, a leaf will work well, an acorn will not.
- Arrange your items on the fabric and press them lightly into the paint. If you are working with flowers and leaves, press their edges as flat as possible. To get a sharp image, the edges need to make contact with the fabric.
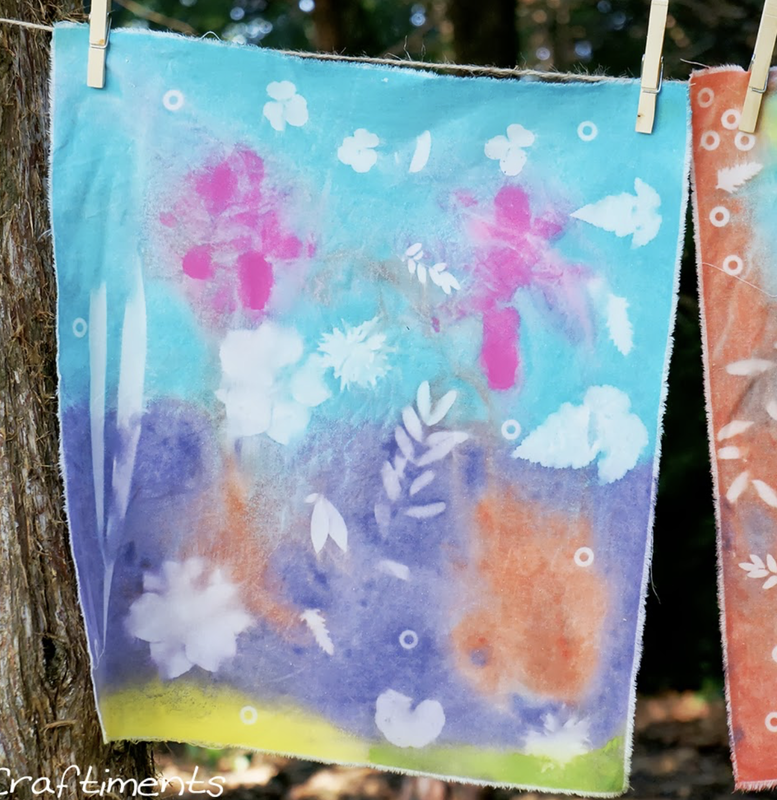
- Let the fabric dry completely (this will take several hours). Now comes the fun part... the peel and reveal! There were lots of "oohs and aahs" from my girls as they pulled off the leaves and flowers.
- To heat set the paint, tumble your sun prints in the clothes dryer at high temperature for about 45 minutes. At this point you can wash the prints to soften them up.
Activity Wrap Up:
Talk about how water evaporates from the exposed surface of the fabric as it is heated by infrared energy from the sun. The covered areas of the fabric are essentially protected from evaporation, making them wetter than the exposed fabric. Water diffuses from the covered fabric to the drier exposed fabric, pulling the paint pigments along with it. The trick is to start with enough water to pull all the pigment out from under the items being printed. Through a little experimentation, I learned that using wet fabric and watered-down paint gives the sharpest prints.
How do I know what my child is learning? (Assessment)
Watch the evaporation video and discuss what you saw. Talk about how this happened to your picture.
How can you extend this activity? (Modifications)
While you wait for it to dry you can paint with water
On the pavement and watch to see the sun make it disappear when it dries.
Helpful Hints: (Pitfalls & Solutions)
Don't try this on a windy day.
Have a spray bottle of water handy. Mist the fabric lightly if it starts drying before you've arranged the leaves and flowers.
Darker colored paints make the best prints because they give the most contrast with the white fabric.
 RSS Feed
