WELCOME THE LAUREL SCHOOL TODDLER, PRESCHOOL & PRE-KINDERGARTEN VIRTUAL CLASSROOMS
  • Welcome
  • Toddler
    • Ms. Naomi & Ms. Haley
    • Ms. Margo & Ms. Tonia
  • Preschool
    • Ms. Rachel
    • Ms. Julia
    • Ms. Taisha
    • Ms. Amanda
    • You Tube Stories & Songs
  • Pre-Kindergarten
    • Ms. Lynn
    • Ms. Nancy
  • Ms. Sunny's Corner
  • Student & Family Shares!
  • Contact

Ms. amanda's home learning resources

​

Grow a Rainbow

4/30/2020

1 Comment


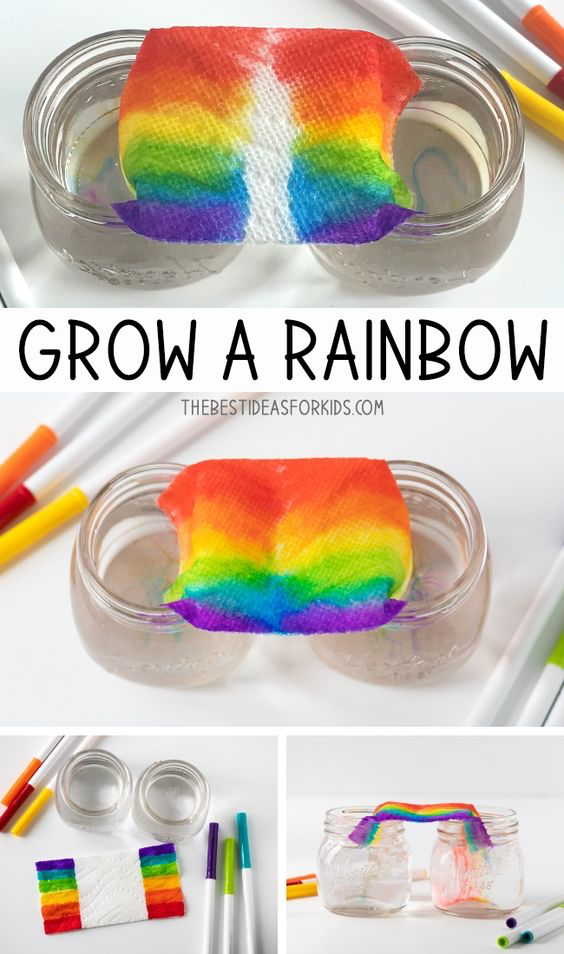
Want to grow your own rainbow? Try this simple science experiment! You only need paper towel, water and washable markers. Kids will love to see their rainbow “grow” in this easy activity!


What is our theme? Grow a Rainbow


What is the lesson (overall purpose)?  
This science experiment is a great example of chromatography. Chromatography is a way of separating out a mixture of chemicals. If you ever got a paper with ink wet you would have seen the ink move across the page in streaks.


MA Guidelines/Standards:
PreK-PS2-1 (MA). Using evidence, discuss ideas about what is making something move the way it does and how some movements can be controlled.
SEL12: The child will demonstrate the ability to reflect on and evaluate the results of his/her actions and decisions.
APL 1: The child will demonstrate initiative, self-direction, and independence.


Learning Outcomes:
  • organize experiments for children to observe, compare, experiment with, predict, and describe.


Songs, Books & Videos (Motivational Techniques)
https://youtu.be/eZFtOQevF1Q - My Color is Rainbow read aloud


Materials:
A paper towel
Water
Washable markers
2 small glasses


Activity (Procedure):
1. Fold over a piece of paper towel (so you have 2 pieces on top of each other). Trim the length to be 7.5 inches (any longer and the rainbow may not connect fully).
2. Draw rectangles of the rainbow colors on each end.
3. Place 2 cups with water filled 3/4 full. You only want the bottom of the paper towel in so leave some space from the top of the cup.
4. The washable marker dye will slowly make it’s way up with the water to meet the other side in the center of the paper towel.
5. Leave the paper towel for 10-15 minutes and it will eventually connect the colors together.


Activity Wrap Up:
Hang the paper towel to dry or lay flat.


How do I know what my child is learning? (Assessment)
  • encourage children to share ideas, feelings, experiences, and perspectives in whatever communication mode they can.


How can you extend this activity? (Modifications)
  • Set up a few different scenarios and hypotheses. For example, if you were to try this experiment without any dye, you would still see the water rising upwards towards the center of the paper towel.

Helpful Hints: (Pitfalls & Solutions)
You need absorbent paper towel or napkin – we used the brand Bounty.
You must use washable markers – make sure to check it’s washable as not all Crayola brands are washable.
Do not place the end of the paper towel too deep into the water or the dye will dissolve into the water instead of traveling up the paper towel.
The shorter the paper towel – the better it works as there is less for the marker dye to have to travel across.
Add lots of marker to the ends. You need lots of dye for it to travel upwards.


​
1 Comment

Homemade bubble wands with homemade bubbles.

4/30/2020

0 Comments

 
Who doesn't like bubbles especially when you can make them yourself!

What is our theme? Homemade bubble wands with homemade bubbles. 


What is the lesson (overall purpose)? 
I want the children to explore using household items to create something special that we usually have to buy at the store.
help children to identify the problem, brainstorm solutions, and agree on one solution. 


MA Guidelines/Standards:
Prek-PS1-4 (MA): Recognize through investigation that physical objects and materials can change under different circumstances (changing state)
W.PK.1: Children can tell you words to express their opinion about a topic.

Learning Outcomes:
help children to identify the problem, brainstorm solutions, and agree on one solution. 


Songs, Books & Videos (Motivational Techniques)
Pictures of homemade bubble wands posted below!


Materials:
-Bubbles
4 cups warm water
½ cup dish soap
½ sugar
1 cup measuring cup
½ cup measuring cup
Large bowl
Whisk

-Wands
Pipe cleaners
An old wire hanger
Beads
Cookie cutters
*All of these items and more can be used to make bubble wands!


Activity (Procedure):
-Bubbles
Whisk the sugar into the warm water until the sugar dissolves.
Add the dish soap and whisk to combine.
This step is only if you have some patience or think to make the solution ahead of time. Letting the homemade bubbles sit for a couple of hours or even overnight helps them work a bit better, but is not strictly necessary.
-Wands
Bend wire or pipe cleaner into your desired shape add beads if you would like.
Dip the top of the wand into bubbles and hold out for the wind to catch it or blow!


Activity Wrap Up:
  • ask reflective questions as children are engaged in activities, such as “What happened when ___? What did you think would happen?”
  • help children connect their plans with implementation (e.g., “You planned to ___, how did it work out?”).


How do I know what my child is learning? (Assessment)
Ask open ended questions and observe. Is your child noticing how the sugar dissolves into the warm water? Why do you think that happened?


How can you extend this activity? (Modifications)
You can also add 1/4 cup of vegetable glycerine to your homemade bubble solution if you like (available from the drugstore or online). And/or 1/2 cup of corn starch. And/or 1 tablespoon of baking powder. Those each make the bubbles work just a tad better. But this is the basic recipe and it works just fine on it’s own.


Helpful Hints: (Pitfalls & Solutions)
If you don't have anything to make a bubble wand with you can try any household item that has holes the bubbles can go in. A strainer, spatula etc.

​
Picture
Picture
Picture
0 Comments

Rain Cloud in a Jar

4/29/2020

0 Comments

 
Fun simple science!!

What is our theme? Rain Cloud in a Jar

What is the lesson (overall purpose)? 
Encourage children to lead or demonstrate activities. 
Reduce stimulation and focus attention through quieter activities. 

MA Guidelines/Standards:
SEL12: The child will demonstrate the ability to reflect on and evaluate the results of his/her actions and decisions.
APL 1: The child will demonstrate initiative, self-direction, and independence.

Learning Outcomes:
I would like the children to observe the changes that take place and the colors they see. 


Songs, Books & Videos (Motivational Techniques)
https://youtu.be/av2FP2n2qrg- The Rainy Day read aloud book


Materials:
Any size glass bowl, jar, vase
Shaving cream (the kind that comes out foam not gel)
Food coloring
water


Activity (Procedure):
Fill the glass container halfway with water
Squirt shaving cream all over the top of the water to make a big rain cloud.
Have your child squeeze a few drops of food coloring on the shaving cream and wait.
Watch to see what happens and continue with adding more food coloring.


Activity Wrap Up:
Look at the different colors that blend together. 


How do I know what my child is learning? (Assessment)
  • ask reflective questions as children are engaged in activities, such as “What happened when ___? What did you think would happen?”
  • help children connect their plans with implementation (e.g., “You planned to ___, how did it work out?”).


How can you extend this activity? (Modifications)
You could also add a few drops of oil to the water to see what happens!
If your child is interested in how the shaving cream feels it is also a fun thing to play with as well! Just squirt some on the table or small tray.


Helpful Hints: (Pitfalls & Solutions)
Make sure you use the foaming shaving cream and not the gel. If you only have the gel you can try spraying it in your hands and making it turn to foam then placing it on the water.

​
Picture
0 Comments

Rain Sticks

4/28/2020

0 Comments

 
April showers bring May flowers! Wouldn't it be fun to make our own rain sounds and get to do some fun counting!

What is our theme? Rain Sticks

What is the lesson (overall purpose)?  
The overall purpose of this lesson is to expand your child's counting abilities through artistic expression.


MA Guidelines/Standards:
PK.CC.4 Count many kinds of concrete objects and actions up to ten, recognizing the “one more”, “one less” patterns, using one-to-one correspondence, and accurately count as many as seven things in a scattered configuration. 
K.CC.4. Understand the relationship between numbers and quantities; connect counting to cardinality. 
a. When counting objects, say the number names in the standard order, pairing each object with one and only one number name and each number name with one and only one object.
b. Understand that the last number name said tells the number of objects counted. The number of objects is the same regardless of their arrangement or the order in which they were counted.
c. Understand that each successive number name refers to a quantity that is one larger.


Learning Outcomes:
To have a better understanding of one to one correspondence where they count multiple objects.


Songs, Books & Videos (Motivational Techniques)
https://youtu.be/tbFGojJxqoo - Signing in the Rain Song and dance


Materials:
Paper towel tube
Rice, beads, beans, (anything small you have around the house to put inside).
Two elastics
Plastic wrap or fabric (anything to keep the ends closed.
Markers, craysons, paint (something to decorate the outside of your rain stick)


Activity (Procedure):
-Decorate the outside of the paper towel tube. This can be done with markers, crayons, paint or you can glue things to the outside. (If you glue or paint you will have to wait for it to dry before moving onto step 2
-Wrap the plastic wrap or whatever you choose around one of the openings of the paper towel tube.
-Wrap the elastic around to hold it in place.
-Fill the tube less than half way with the rice.
-Seal up the other end of the tube with the plastic wrap and elastic.
-Gently shake or turn over slowly to make the rain sound!


Activity Wrap Up:
Listen to the signing in the rain song and see if you can do the dance while shaking your rain stick.

How do I know what my child is learning? (Assessment)
While picking out what to put in the rain stick have your child count each bean or rock or whatever you choose to put in it.

How can you extend this activity? (Modifications)
You can make more than one and put different things in each to compare the sounds each one makes.

Helpful Hints: (Pitfalls & Solutions)
If you are afraid the contents inside the rain stick will spill out you can use glue and glue a circle piece of cardboard to each end before you wrap 

​
0 Comments

Wind Chimes

4/27/2020

0 Comments

 
The weather is always changing where we live so let's explore different weather patterns!

What is our theme? Wind Chimes

What is the lesson (overall purpose)?  
To explore wind, when the wind chime blows in the wind which way does it go? 
To discover what is around you that you can use to hang from your wind chime. 

MA Guidelines/Standards:
APL4: The child will demonstrate creativity in thinking and use of materials.
SEL12: The child will demonstrate the ability to reflect on and evaluate the results of his/her actions and decisions.
APL 1: The child will demonstrate initiative, self-direction, and independence.

Learning Outcomes:
To build critical thinking skills when trying to find the best way to hang your found materials to the wind chime.


Songs, Books & Videos (Motivational Techniques)

https://youtu.be/X7t--zPZdic- wind chime sound

Materials:
Sticks
Cap from a coffee can or metal lid from a mason jar
Shells
Acorns
Pinecones
Beads
String, ribbon, or fishing line


Activity (Procedure):
Look at the pictures of different wind chimes or ones you may have.
This project can be done in so many different ways using just about anything.
Use a stick or lid from an old container as the top of your wind chime.
Hanging different things from this using the string, ribbon, or fishing line.


Activity Wrap Up:
Hang your wind chime up and see and hear what happens when the wind blows.


How do I know what my child is learning? (Assessment)
  • ask reflective questions as children are engaged in activities, such as “What happened when ___? What did you think would happen?”
  • help children connect their plans with implementation (e.g., “You planned to ___, how did it work out?”).


How can you extend this activity? (Modifications)
While out on a walk in the neighborhood or driving in the car play a game where you look for different wind chimes and discuss similarities and differences from the ones you made.


Helpful Hints: (Pitfalls & Solutions)
If you are not able to find a good way to fasten the materials to the string or fishing line you can have your child place everything where they want it and hot glue it.

​
Picture
Picture
0 Comments

recycle art reflection drawings

4/24/2020

0 Comments

 
Are you proud of all that you accomplished this week! Now let's look back and draw a picture of all your hard work.

What is our theme? Recycle Art Reflection Drawings

What is the lesson (overall purpose)?  
To look back and reflect on the projects you have done this week using recycled materials.
To make sure tasks are developmentally appropriate and “challenging but achievable.” 

MA Guidelines/Standards:
W.K.3. Use a combination of drawing, dictating, and writing to narrate a single event or experience, or several loosely linked events or experiences; sequence the narrative appropriately and provide a reaction to what it describes.
W.PK.2. Use a combination of dictating and drawing to supply information about a topic.

Learning Outcomes:
To reflect on all that you have learned this week.

Songs, Books & Videos (Motivational Techniques)
https://youtu.be/WUXEeAXywCY - Gentle music to listen to while coloring

Materials
Paper
Coloring utensils

Activity (Procedure):
Take a look at all you have created this week.
What do you see?
What was your favorite project and why?
Can you draw a picture or pictures of your projects from this week?

Activity Wrap Up:
Reflect on what you have done this week. Talk about the different projects.
Share your pictures with the class during our group WebEx meetings.


How do I know what my child is learning? (Assessment)
  • ask open-ended questions that create dialogue (e.g. “What do you think about…?” “Tell me more about it.” “How do you know that?”).

How can you extend this activity? (Modifications)
If your child is interested in creating these drawings you can turn it into a book and draw a picture of each project.


0 Comments

cardboard construction

4/23/2020

0 Comments

 
What can you do with cardboard!? The possibilities are endless!!
Our Lessons For the Week! “Fun With Recycling”

What is our theme?  Cardboard Construction

What is the lesson (overall purpose)?  
The overall purpose of this lesson is for your child to use critical thinking skills and to take ordinary things such as cardboard and paper towel tubes and create something special.
To provide hands-on experiences that motivate children to apply skills and prior knowledge. 

MA Guidelines/Standards:
PK.CC.4 Count many kinds of concrete objects and actions up to ten, recognizing the “one more”, “one less” patterns, using one-to-one correspondence, and accurately count as many as seven things in a scattered configuration. 
K.CC.4. Understand the relationship between numbers and quantities; connect counting to cardinality. 
    a. When counting objects, say the number names in the standard order, pairing each object with one and only one number name and each number name with one and only one object.
    b. Understand that the last number name said tells the number of objects counted. The number of objects is the same regardless of their arrangement or the order in which they were counted.
    c. Understand that each successive number name refers to a quantity that is one larger.
PK.MD.2. Compare the attributes of length and weight for two objects, including longer/shorter, same length; heavier/lighter, same weight; holds more/less, holds the same amount.

Learning Outcomes:
I would like the children to get used to looking at everyday things and finding other ways to use those things. During this they can be counting the items they have. Seeing how high they can make these items go as well as seeing how many pieces of cardboard it takes to make something special to you.

Songs, Books & Videos (Motivational Techniques)
https://youtu.be/YnyNzJ8_rgQ - Not A Box read aloud by Ms. Amanda

Materials
Assorted piece of cardboard
Paper towel rolls

Activity (Procedure):
Collect an assortment of different size pieces of cardboard.
Some thick and thin. Big and small
Your child can use these things to build in the house or outside in the yard.


Activity Wrap Up:
This project is endless fun. Your child can build and unbuild all day with just some cardboard and recycled materials.


How do I know what my child is learning? (Assessment)
How is your child doing trying to balance the cardboard to create something that is 3-D. Are they feeling frustrated if something falls or does not work the way they want? Talk to them about these feelings.


How can you extend this activity? (Modifications)
This activity is open ended. Your child can bring some other toys to add to their cardboard masterpieces. They can color on the pieces as well.
They can make more than one structure and you can talk about which one is bigger and which one is smaller. Which one is taller and which one is shorter. All of these descriptive words are great to use with your child.


Helpful Hints: (Pitfalls & Solutions)
Have an assortment of different size pieces of cardboard. This can be done the night before and you can cut everything up to get the desired sizes.

Picture
0 Comments

recycling self portrait

4/22/2020

0 Comments

 
Wouldn't it be fun if you could make a self portrait using only found materials!?

Our Lessons For the Week! “Fun With Recycling”

What is our theme? Recycling self portrait and cardboard picture frame.

What is the lesson (overall purpose)?  
To find things in your home to create with and repurpose. 

MA Guidelines/Standards:
APL4: The child will demonstrate creativity in thinking and use of materials.
APL 1: The child will demonstrate initiative, self-direction, and independence.

Learning Outcomes:
To understand the characteristics that make up a face. Two eyes, a nose and a mouth. Can you make a face with all of these things using recycled materials?

Songs, Books & Videos (Motivational Techniques)
https://youtu.be/-ueQ7ZCa7bg - I Like Me read aloud by Ms. Amanda

Materials
A piece of cardboard with a rectangle cut out of the middle for the frame.
Paper 
Coloring utensils
Paint (if your child wants to paint the frame or they can color it.)
Small recycled materials to make a face in the center of the frame.

Activity (Procedure):
First decorate your frame.
Then you are going to use the found material to make a face in the middle of your frame.
You can glue these pieces down if you choose to keep it one face or save the found materials and the frame to do this project more than once! Then you can continue finding more “small parts” to add to your collection!

Activity Wrap Up:
Decide whether the project is something you want to make permanent and glue the pieces to a piece of paper 

How do I know what my child is learning? (Assessment)
Is your child putting the eyes where eyes would typically go? Are they trying to match the correct color to their own eye color and hair color?

How can you extend this activity? (Modifications)

You can set up a mirror for your child to look at themselves while creating their self portrait. You can ask them what they see.

Helpful Hints: (Pitfalls & Solutions)
These projects are great to plan ahead and be collecting stuff beforehand. Let your child go on a scavenger hunt and find things but also have some items you have already found for them to use.

​
Picture
Picture
0 Comments

recycle robots!

4/21/2020

0 Comments

 
Can you create your own recycle robot!? What will it look like? What will its name be!?

Our Lessons For the Week!  “Fun With Recycling”

What is our theme?
Recycle Robot


What is the lesson (overall purpose)? 
To find things in your home to create with and repurpose. 
To provide opportunities for children to explain their thinking and receive feedback about how they reached a decision or created an object or project.

MA Guidelines/Standards:
SEL1: The child will be able to recognize, identify, and express his/her emotions.
APL4: The child will demonstrate creativity in thinking and use of materials. engage in imaginative play and storytelling in which children change or make up their own endings.
PK.G.3. Create and Represent three-dimensional shapes (ball/sphere, square box/cube, tube/cylinder) using various manipulative materials (such as popsicle sticks, blocks, pipe cleaners, pattern blocks).

Learning Outcomes:
To be able to use your imagination to create 


Songs, Books & Videos (Motivational Techniques)
https://youtu.be/Gz2ZuGYvcn8 - Recycling is Fun read aloud by Ms. Amanda
https://youtu.be/6T1ZKVPO-fM - Don't Throw That Away read aloud by Ms. Amanda

Materials
Glue
Paper
Markers
scissors
Any recycled material will work!
Ideas/suggestions:
  Milk carton
  Caps from bottles (for the eyes or wheels)
  Shoe box
  Paper rolls
  Apple sauce/ yogurt containers
  

Activity (Procedure):
Use the different recycled materials to create your robot. 
Will your robot have a head, eyes, arms?
You can tape or glue pieces to your robot.
Please

Activity Wrap Up: Please bring your recycle robot to the next WebEx meeting to show your friends!

How do I know what my child is learning? (Assessment)
Can your child share with you some descriptive words about their robot?
What recycled materials did they use and why?

How can you extend this activity? (Modifications)
You can play with your robot! Give it a name and make it talk. If your child is having a hard time with something or is feeling sad this robot can help! You can make the robot talk and talk about feelings.

Helpful Hints: (Pitfalls & Solutions)
All materials are optional and just suggestions. This is about creativity and using what you have at home which will be different from others.

​
Picture
Picture
0 Comments

"not a box" Activity

4/20/2020

0 Comments

 
Do you like to turn an old box into a fun new activity!? Well if you do all you will need is a large box and your imagination!

Our Lessons For the Week!  “Fun With Recycling”

What is our theme?  “Not A Box”

What is the lesson (overall purpose)? 
To use your imagination. To take what you have learned from the “Not A Box” book and apply it to your own play.

MA Guidelines/Standards:
APL3: The child will be able to maintain focus and attention, and persist in efforts to complete a task.
APL 2: The child will demonstrate eagerness and curiosity as a learner.

Learning Outcomes:
  • provide opportunities for children to explain their thinking and receive feedback about how they reached a decision or created an object or project.

Songs, Books & Videos (Motivational Techniques)
https://youtu.be/YnyNzJ8_rgQ - Not A Box read aloud by Ms. Amanda

Materials
A large box
Coloring utensils

Activity (Procedure):
Use a large box.
You can decorate the box with different coloring utensils
You can cut out doors or windows.

Activity Wrap Up:
Use this large box for pretend play. You can incorporate toys and other things in your play.

How do I know what my child is learning? (Assessment)
How are they able to describe what they are pretending their box is? What types of descriptive words are they using?

How can you extend this activity? (Modifications)
You can add pillows and blankets and make the box a place to have quiet time.

Helpful Hints: (Pitfalls & Solutions)
If you don't have a box you can use a laundry basket.

​
0 Comments
<<Previous

    Author

    Ms. Amanda - Preschool 
    Assistant Preschool Director 

    Archives

    June 2020
    May 2020
    April 2020
    March 2020

    Categories

    All

    RSS Feed

Powered by Create your own unique website with customizable templates.